- The verified AC technicians in our ProNearMe network report that 58 percent of "new install. gone wrong" callbacks would have been caught on day-of-install if the owner had insisted on a 20-minute vacuum hold, a 10 to 12 degree cooling delta test and a 1 litre drain pan flow check.
- Hold back the final 30 percent of the installation payment for at least 24 hours after commissioning. Most slow refrigerant leaks at flare joints become measurable only after a full overnight pressure cycle, and an unpaid balance keeps the installer responsive.
- BEE labelling rules require the BEE star sticker and BIS ISI mark to be physically. visible on the outdoor unit's nameplate. If either is peeled or covered, the unit may be a refurbished or grey-market piece and the warranty is voidable.
- A healthy new split should record a supply-air temperature 10 to 12 degrees below the. return air at the indoor coil within 20 minutes of switch-on. Any delta under 8 degrees is a commissioning fault, not a settling-in issue.
- The 15-point owner-side checklist maps directly to the ISHRAE residential commissioning programme. Running it adds 30 to 45 minutes to the visit and is the single highest-return habit in AC ownership.
A new AC install in an Indian flat is a two-hour job that looks routine until it is not. The team arrives, drills the wall, hoists the outdoor unit onto the bracket, runs the copper through the sleeve, vacuums the line, opens the gas valves, fires up the unit, hands you a remote and asks for the balance payment. Most owners pay on the spot.
Two weeks later the cooling drops, a faint hiss comes from a flare joint and the installer's number stops connecting. This new ac setup guide is the 15-point verification checklist you should run with the installer present, on the same afternoon, before you release the final 30 percent of the payment.
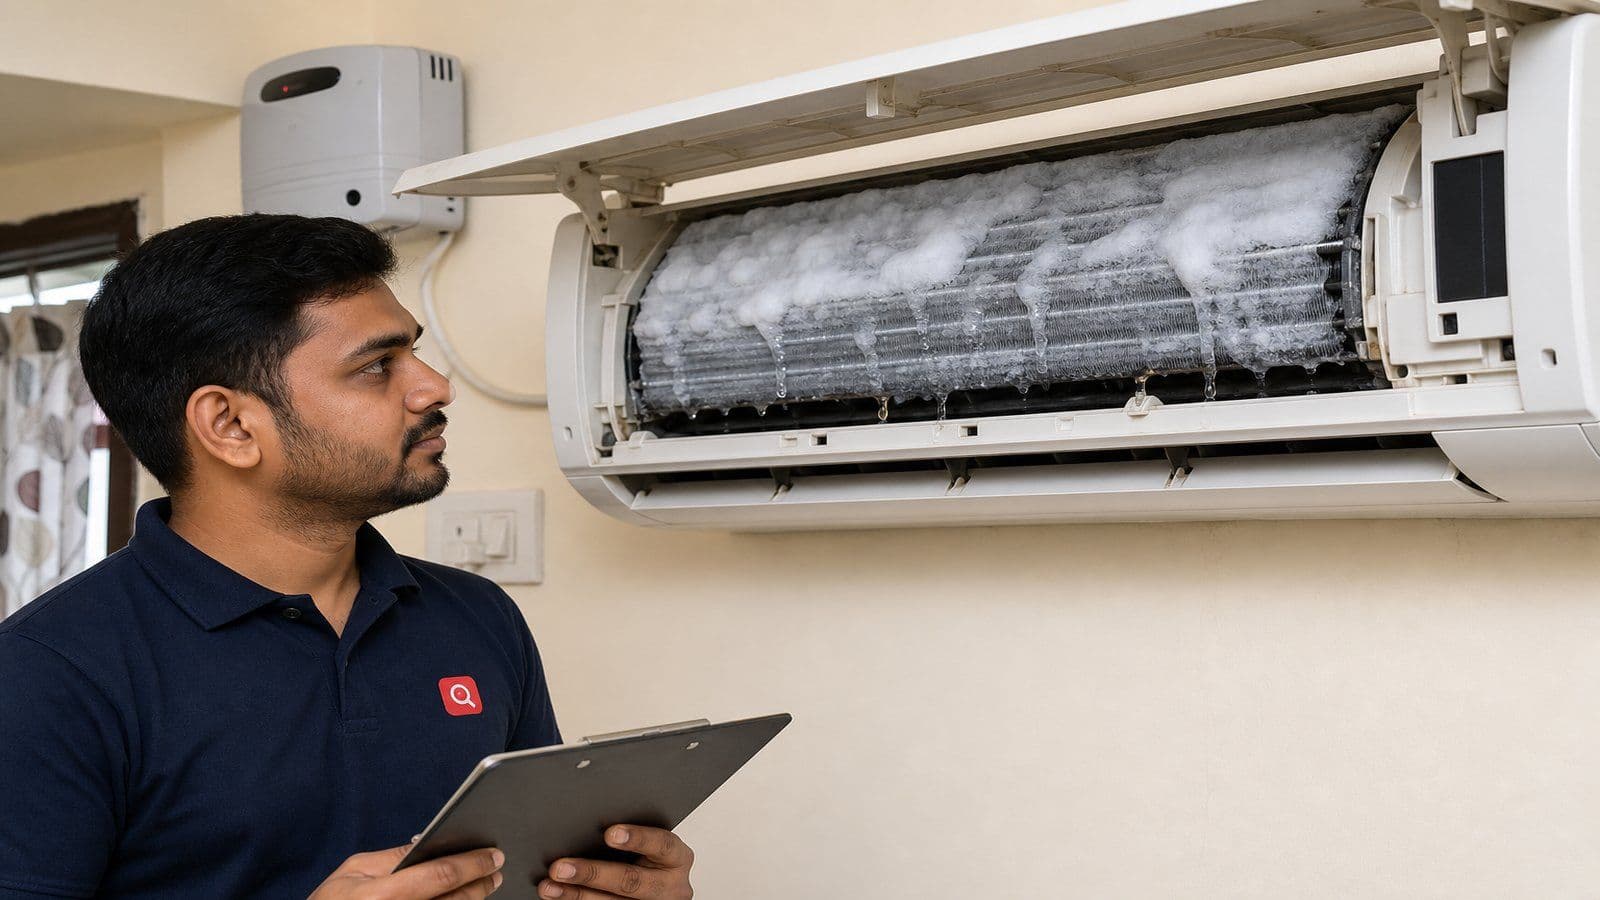
Amit has spent 14 years across 2,800+ service calls in Mumbai, Pune and Hyderabad. A clear pattern shows up in our post-installation complaint data: nearly six in ten "new AC not cooling properly" callbacks in the first 90 days could have been caught on day-of-install by an owner with a thermometer, a 1 litre bottle of water and a phone camera.
The Bureau of Energy Efficiency (BEE) and Bureau of Indian Standards (BIS) both publish field-test protocols for residential commissioning, and the 15 checks here are a homeowner-friendly subset. For the wider planning context covering brand selection, copper sizing and society approval, start at the parent pillar on AC installation, the complete guide for Indian homes.
Get quotes from top-rated pros.
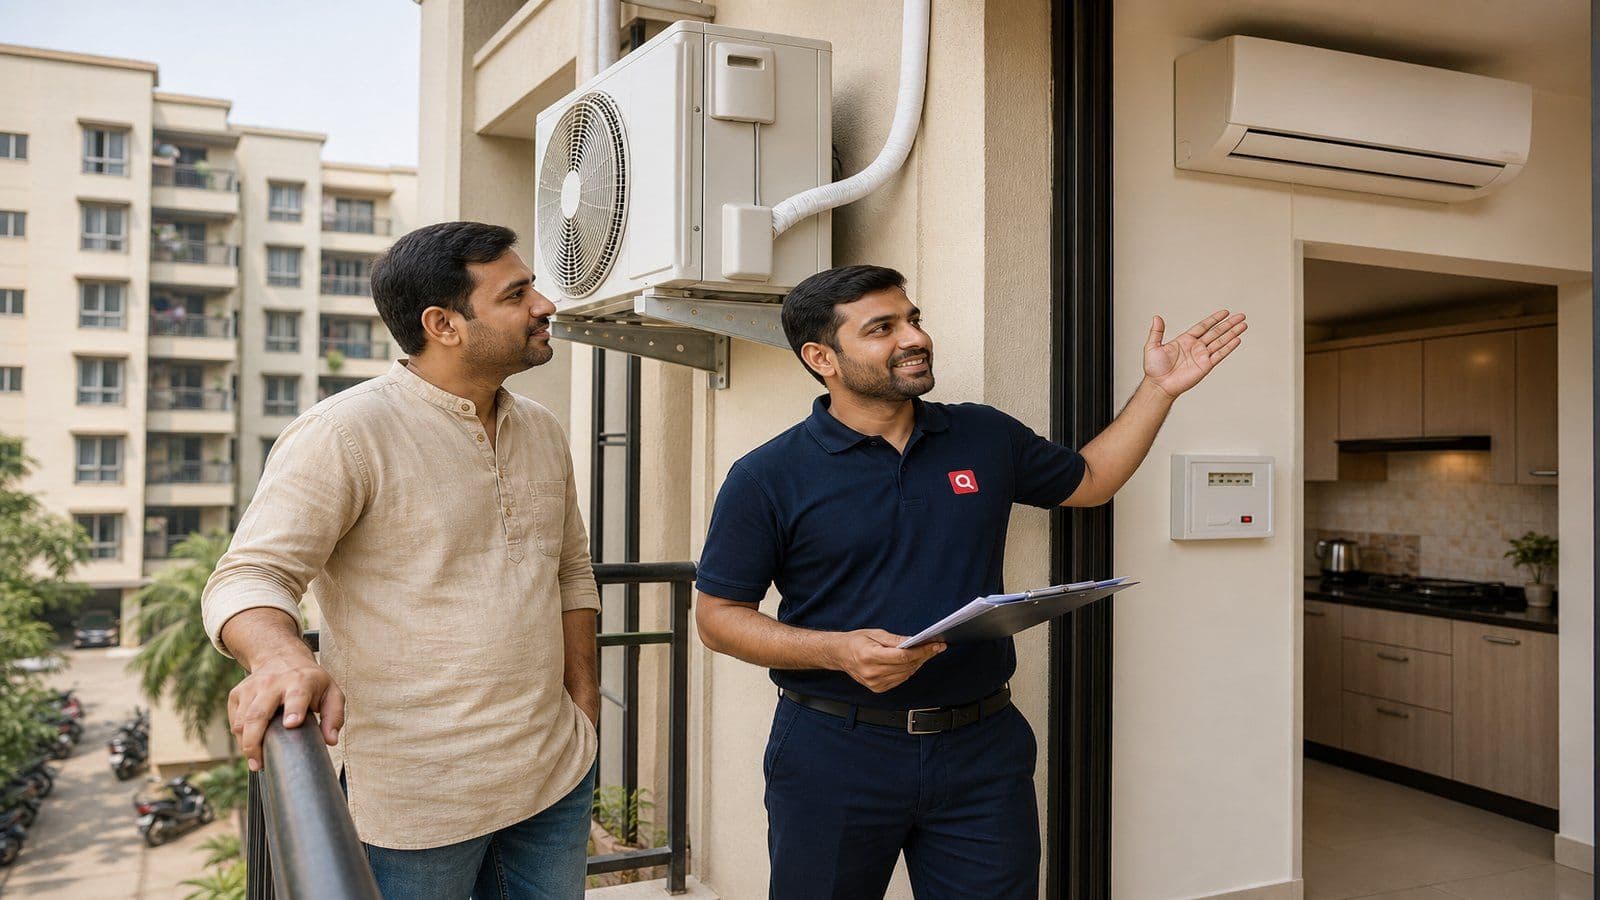
Photo: Indian homeowner and ProNearMe technician at AC installation handover
Why Day-of-Install Matters More Than Day-30
Most OEM warranties start the day the AC is commissioned. So does the clock on installer accountability. Once the team drives away with full payment, every fault becomes a negotiation: the installer will blame misuse or voltage, the brand service centre will blame the install, and you will spend two weeks on the phone before anyone returns.
Day of install is the only moment when you have leverage, the installer is physically present and the system is in a known fresh state. The Press Information Bureau (PIB) has published consumer advisories noting that appliance complaints in summer routinely hit a 30 to 40 day resolution window once a ticket is logged, and the burden of proof in install-versus-manufacturing disputes sits squarely on the owner.
A gauge photo at vacuum, a thermometer reading of the cooling delta and a signed checklist resolve these disputes in days rather than weeks.
The 15-Point Owner Verification Checklist
Run this sequence with the installer present, in order, ending with the final 30 percent payment release. Each point states how to test in 30 seconds, what result confirms a pass and what to ask the installer to correct before sign-off. Use a printed copy on a clipboard, tick each item in front of the installer, and photograph the relevant readings as you go.
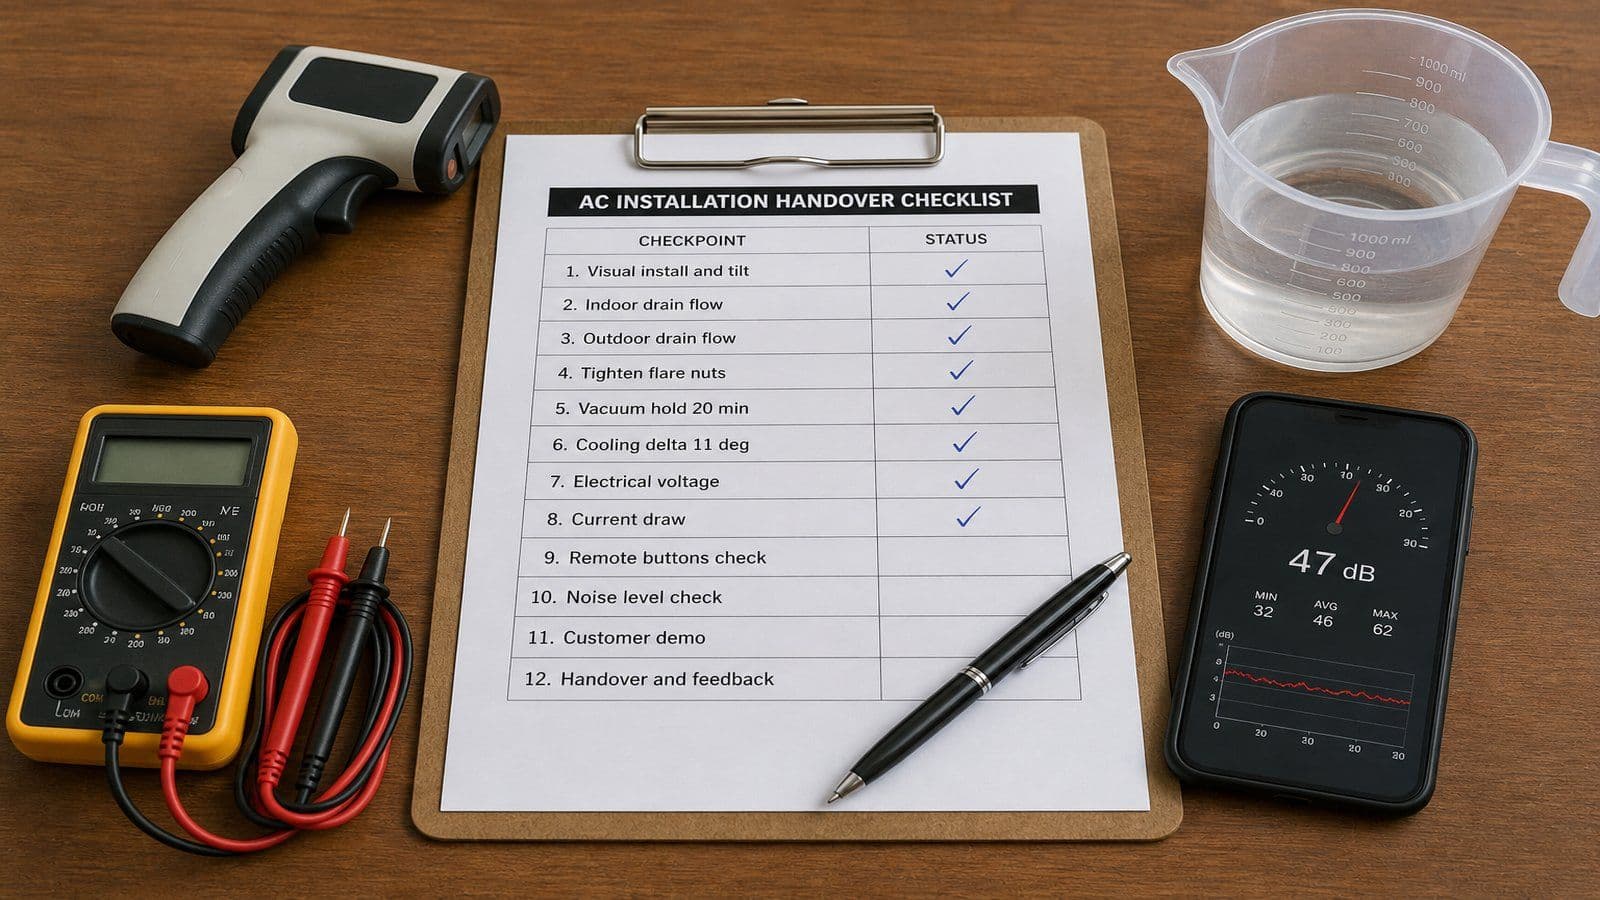
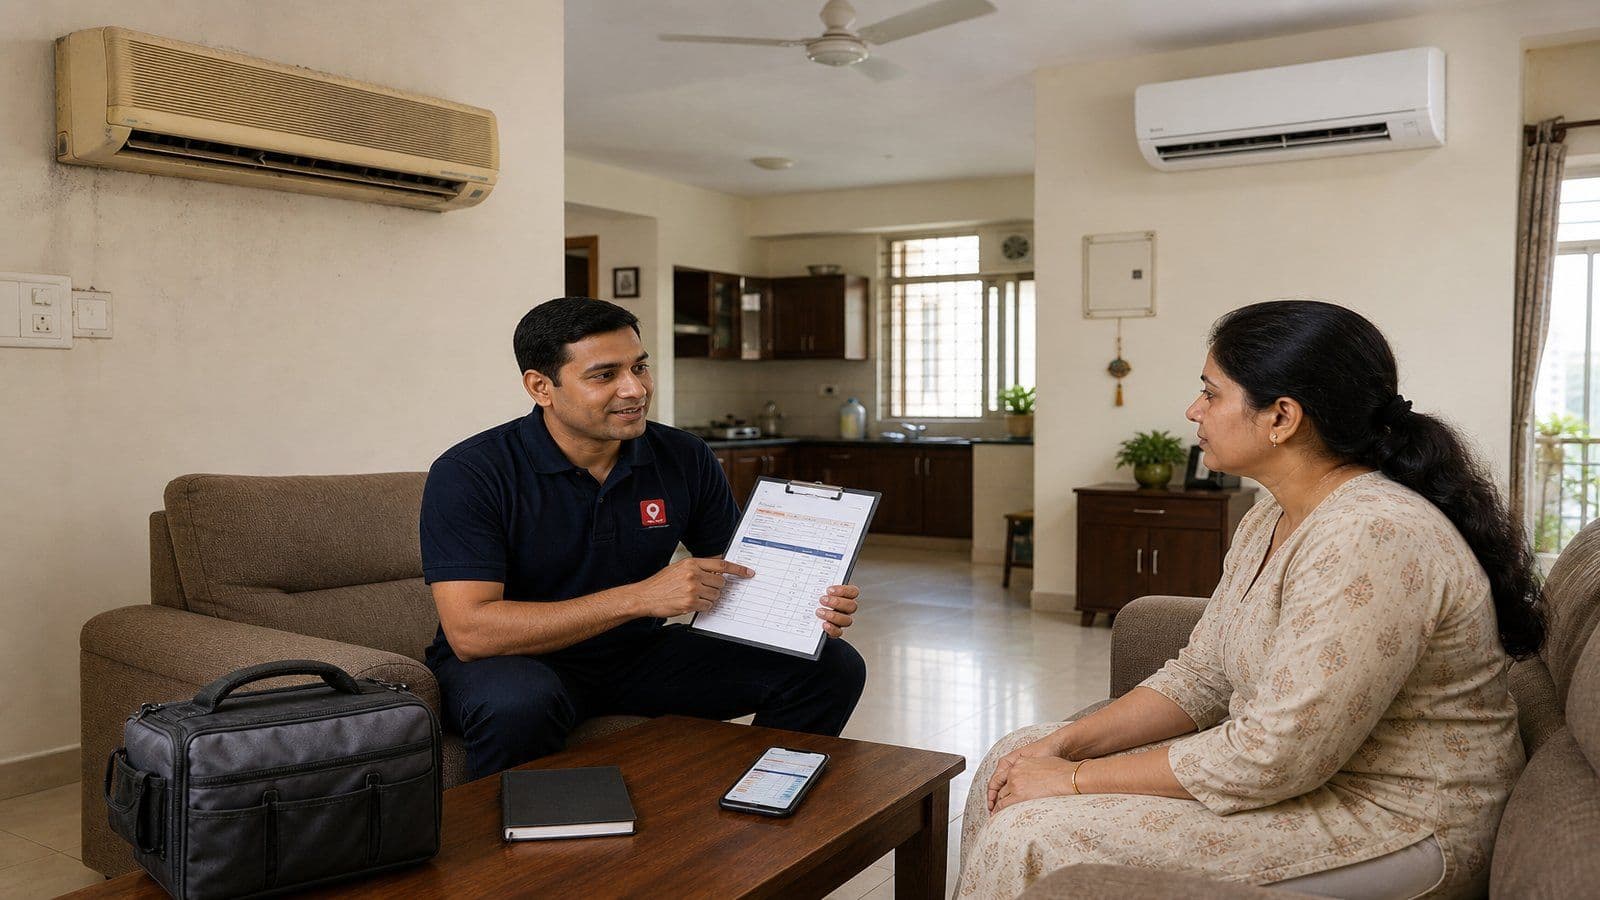
Photo: Day-of install verification clipboard and tools
1. Visual Install, Tilt and Clearances
Stand back two metres and view the indoor unit at eyeline. It should sit flush, with the drainage side angled marginally lower, no more than 5 to 8 mm of tilt. The outdoor bracket should be bolted with through-bolts and washers on both sides, not friction screws. Maintain 15 cm clearance behind and 50 cm in front of the fan grille. A reversed indoor tilt will pool condensate and either drip into the room or short the PCB.
2. Vacuum Hold Proof
Before gas enters the line, the installer must pull vacuum to remove air and moisture. Standard is 20 minutes at minus 76 cmHg or better. Keep the gauge manifold connected for the full 20 minutes after the pump stops, and photograph the needle at minute 1, 10 and 20. Any meaningful drift towards zero means a leak that must be fixed before gas release. Releasing refrigerant into a leaky line is the single most common cause of "new AC not cooling after one month".
3. Refrigerant Pressure Check
Ten minutes after the gas valves open, clip a gauge manifold to the high and low service ports. For R32 (the dominant refrigerant in new Indian residential ACs in 2026), low side sits around 110 to 130 psi and high side around 380 to 430 psi at 35 degrees outdoor, varying by brand. The brand spec sticker on the outdoor unit prints the rated range; ask for the readings to match.
4. Cooling Delta Test
The single most useful homeowner check. Set the AC to 18 degrees, fan high, and let it run 20 minutes. Measure return air at the top intake grille and supply air at the louvre with any infrared thermometer. The difference should be 10 to 12 degrees on a healthy split, pushing 13 to 15 degrees on a well-charged inverter. A delta of 8 degrees or less means undercharged refrigerant, poor airflow or a coil obstruction (sometimes the protective film over fins is forgotten). Six degrees is a hard fail.
The cooling delta test is the one check I tell every customer to insist on, and it is the one installers most often try to skip. It takes a ₹400 kitchen thermometer and 20 minutes of waiting. We have seen unit after unit handed over with a 6 to 7 degree delta, the customer accepts because the room feels cooler than outside, and the unit comes back to us in October with a burned compressor because it ran undercharged through the whole summer. If you do nothing else, do the delta test.

5. Drainage Flow Test
Carry a 1 litre bottle of water to the indoor unit. Lift the front cover, pour the water gently into the drain pan, then walk outside and watch the drain pipe outlet. The water should exit within 30 to 60 seconds. If it backs up, the line is blocked or has an uphill section. A drainage failure on day one becomes a ceiling stain in week three of monsoon.
Get quotes from top-rated pros.
6. Vibration Check
With the outdoor unit running five minutes, place your palm flat on the side casing. You should feel a steady hum, not a sharp rattle. Listen for ticking from loose grille screws. Press the unit forward, back and sideways with both hands; there must be no perceptible play. Anti-vibration rubber pads must sit between unit feet and bracket. Day-one rattle becomes loose bolts and cracked flares in six months.
7. Noise Level
Use any free smartphone dB meter app set to A-weighting. Stand one metre in front of the outdoor fan grille at full load: the reading should be under 50 dB. Indoor reading at one metre below the unit at high fan should be under 45 dB. The ISHRAE residential guidance flags 50 dB as the outdoor upper bound in dense apartment layouts to avoid neighbour complaints.
8. Remote Pairing and Button Function
Step through every primary function with the unit running: cool, dry, fan and heat (if equipped); every fan speed; swing on both louvres; sleep; timer; temperature up and down. Test from across the room, not point-blank. Some installers test only at the unit and miss a weak transmitter LED. If any button fails, the remote needs replacing before you accept the unit.
9. MCB Rating and Earth Continuity
Check the breaker dedicated to the new AC. A 1.5 ton inverter typically needs 16 or 20 amp; a 2 ton needs 25 amp. The Central Electricity Authority (CEA) wiring regulations require a dedicated breaker for any appliance above 1500 watts continuous load. Ask the installer to verify earth continuity with a multimeter: resistance between the AC's earth terminal and the building's earth bus should read under 1 ohm.
10. Copper Pipe Insulation Continuity
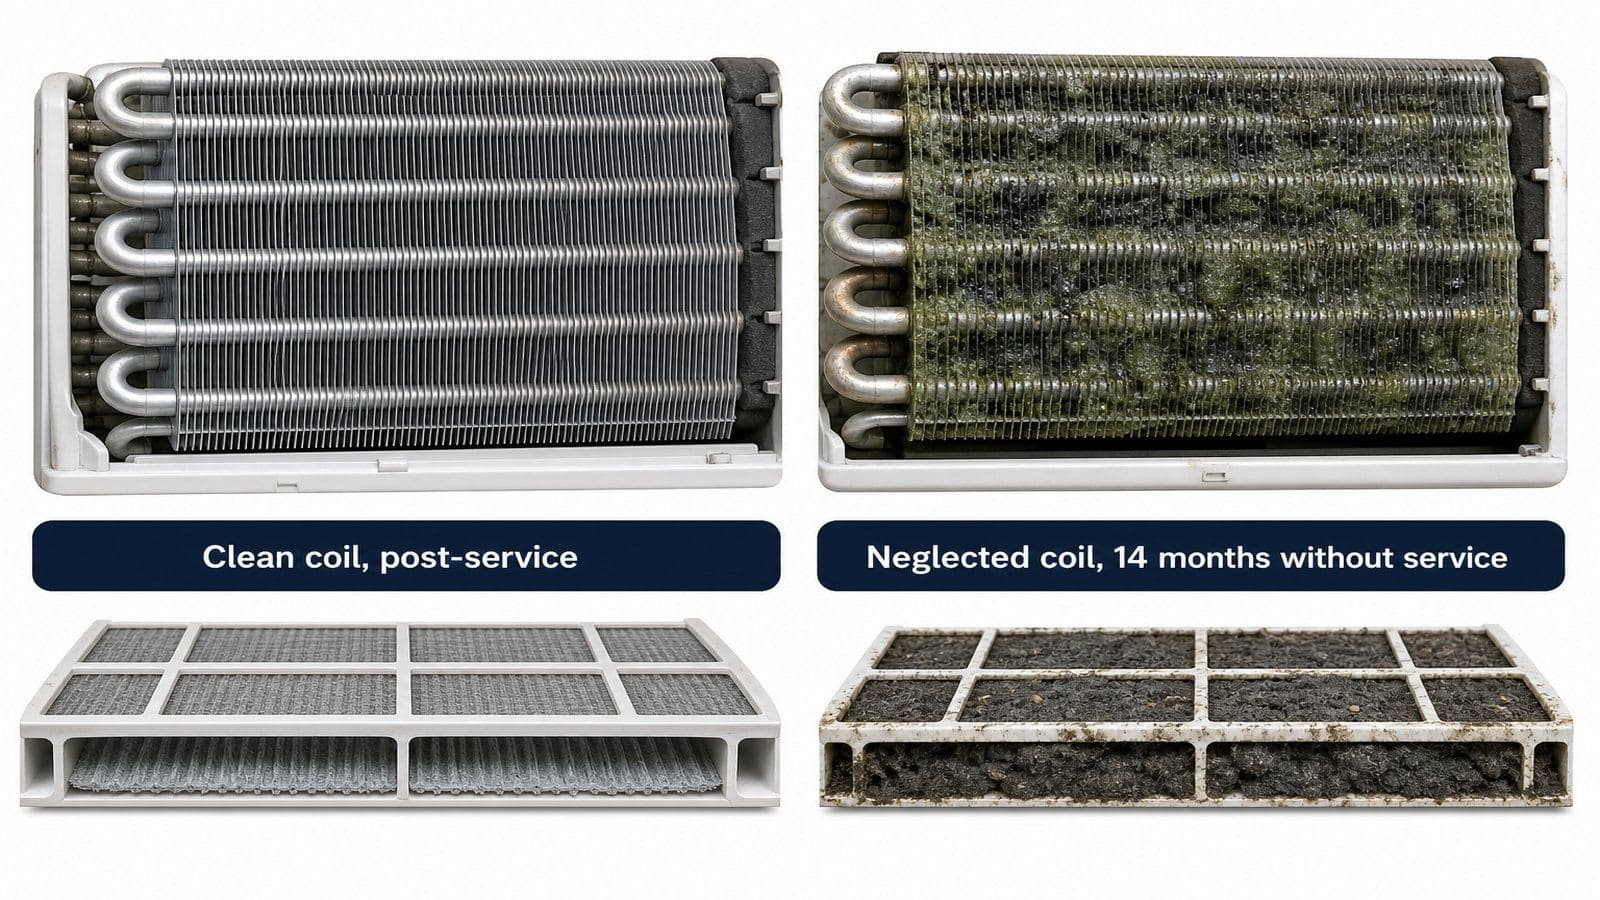
Walk the length of the copper line from indoor to outdoor. The suction line (the thicker pipe) must be wrapped in closed-cell foam along its entire length, including behind the indoor unit, through the wall sleeve, down the outdoor wall and right up to the service valve. Any exposed bare copper, even a 5 cm gap at a turn, will sweat in monsoon and act as a heat sink. Foam tape costs ₹40 a roll.
11. Drain Pipe Exit Point
Trace where the condensate drain ends. It must discharge into open air or your own balcony drain, not onto a lower flat's window, balcony or wall. Society bylaws across most Indian complexes treat AC drain discharge onto a neighbour's property as a complaint-worthy nuisance. The exit must also be visible so you can confirm the unit is draining.
12. Outdoor Unit Security
If the outdoor unit is at ground level, on a low parapet or reachable from a corridor, ask about an anti-theft cage. Copper-bearing outdoor units are a documented theft target in Indian metros; a basic angle-iron mesh cage with padlock costs ₹1,800 to ₹3,500 fitted. Even on higher floors, confirm bracket bolts are torqued and ask for thread-lock on each thread, a one-rupee precaution that prevents bolts working loose over years of vibration.
Outdoor unit theft from ground-floor and first-floor flats has become a real category in Pune and Hyderabad societies over the last three years. We have replaced units lifted clean off their brackets at 2 am because the installer used finger-tight nuts. A cheap anti-theft cage and a torque-tightened bracket are the difference between a one-time concern and an annual insurance claim. Pay the extra ₹2,000 on install day, not after the unit is gone.
13. Warranty Paperwork
Before the installer leaves, verify every field on the warranty card and invoice. The serial number on the card must match the serial sticker on the outdoor nameplate (photograph both side by side). The installation date must be written and signed. The dealer stamp must be present. Confirm the BIS ISI mark and BEE star sticker are physically present and not tampered with. BIS requires the ISI mark on every room air conditioner sold in India under IS 1391; a missing or defaced mark is a strong indicator of a refurbished or grey-market unit. Register the warranty online the same evening.
14. Genuine Spares Confirmation
Ask the installer to show you the original outer carton or photograph it. The model number on the carton must match the indoor and outdoor nameplates. Confirm the outdoor nameplate shows the rated capacity, star rating and refrigerant type you ordered. A common scam in price-pressured installs is substitution of a lower-spec or remarked refurbished unit at full price. Photograph model number, serial number and BEE label on both units before the installer leaves.
15. AMC Offer Review
Most installers will offer an AMC on the spot, often at a "today only" discount. Do not accept on installation day. Take the offer, inclusions list and price, and tell the installer you will compare options after 48 hours. Comparing the brand's AMC, the installer's AMC and an independent service network like ProNearMe verified AC technicians takes a calm hour, not a pressured 15 minutes.
Get quotes from top-rated pros.
The day-of AMC sale is one of the highest-margin moments in the install business, which is exactly why it is pitched so hard. A 48 hour cooling-off window costs the customer nothing and almost always organises a better deal. We have seen owners save 25 to 40 percent on first-year AMC pricing just by waiting two days and getting one competing quote. Never sign anything else the same afternoon you sign the install handover.
Pass and Fail Summary at a Glance
| # | Check | How to Test | Pass Criteria |
| 1 | Visual install and tilt | Eyeline view from 2 m | Flush mount, ≤ 8 mm drainage tilt, 15 cm rear, 50 cm front clearance |
| 2 | Vacuum hold | Watch gauge 20 min after pump off | Holds at minus 76 cmHg, minimal drift |
| 3 | Pressure check | Gauge manifold reading after 10 min | Within brand-printed spec on outdoor nameplate |
| 4 | Cooling delta | Thermometer at intake and louvre after 20 min | 10 to 12 degrees lower at louvre |
| 5 | Drain flow | 1 L water into pan, watch outdoor exit | Water exits within 30 to 60 seconds |
| 6 | Vibration | Palm on outdoor casing, push test bracket | Steady hum, no rattle, no bracket play |
| 7 | Noise | dB app at 1 m, indoor and outdoor | Under 50 dB outdoor, under 45 dB indoor |
| 8 | Remote function | Step through every button across room | Every function responds, display updates |
| 9 | MCB and earth | Visual breaker check, multimeter earth | Dedicated breaker matched to load, earth under 1 ohm |
| 10 | Copper insulation | Walk the line, look for bare copper | Full closed-cell foam coverage, zero gaps |
| 11 | Drain exit | Trace pipe to discharge point | Open air or own balcony drain, visible flow |
| 12 | Outdoor security | Inspect bolts, discuss cage | Torqued bolts with thread-lock, cage if reachable |
| 13 | Warranty paperwork | Cross-check serial and ISI mark | Numbers match, ISI mark intact, installer signature |
| 14 | Genuine spares | Photograph carton and nameplates | Model and rating match the order |
| 15 | AMC review | Take offer in writing | 48 hour comparison window before signing |
The 24-Hour Payment Hold Rule
The most useful contract-side habit in new AC installation in India is to release the final 30 percent only 24 hours after commissioning. Most installers resist this if sprung on them at handover. The fix is to write it into the original quotation before any work begins: "70 percent on completion of physical install, 30 percent on day-of-install plus one after overnight operational verification".
It works because slow refrigerant leaks at flares, micro-cracks on indoor coils and PCB voltage issues tend to surface within the first overnight cycle. An installer owed 30 percent will return promptly on day two with their tools. An installer paid in full will take five to ten days, by which time the proof-of-condition has muddied. In our ProNearMe network, verified AC technicians on residential install jobs note that around 1 in 8 new installs surface a minor commissioning fault in the first 24 hours, almost always a 30 minute fix.
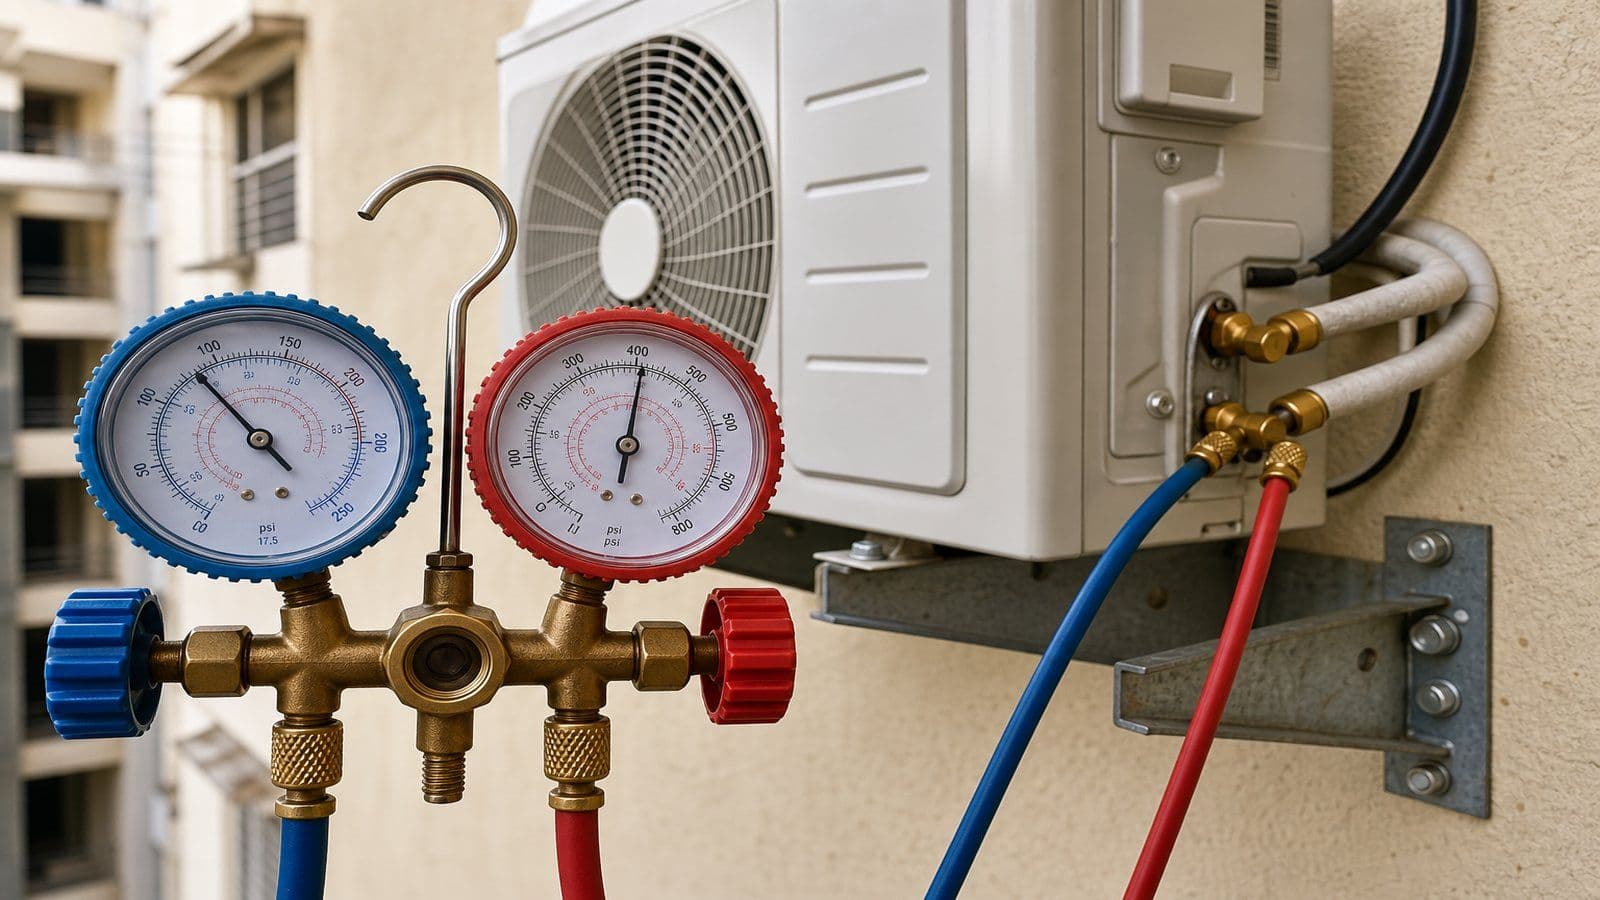
Photo: Refrigerant gauge manifold on outdoor unit service ports
Case Study from a Pune Society Install
Mrs. Anjali Kulkarni, a customer in Kothrud, Pune, ordered a 1.5 ton inverter split through a local dealer in March 2026. The install team finished in 90 minutes and asked for the balance ₹4,200. She had read this checklist the night before, printed it, and asked the technician to wait while she ran the 15 points. Three issues surfaced: the cooling delta was 7 degrees (the protective film over the indoor coil had been left in place), the drain water took four minutes to exit (the pipe had a slight uphill kink at the wall sleeve) and the suction copper had a 12 cm bare section behind the indoor unit. The lead technician initially protested that "the unit is cooling fine, ma'am". She held firm on the 30 percent balance and the team came back the next morning, removed the coil film, re-pitched the drain and foam-wrapped the bare copper. Final delta on day two measured 11.5 degrees. The install has run without callbacks for the 14 months since. Mrs. Kulkarni's ₹4,200 balance, withheld for less than 24 hours, fixed three faults that would have cost an estimated ₹6,500 to ₹9,000 to resolve under a warranty dispute six months later.
Sibling Resources for the Wider Installation Journey
For the technical install steps of the most common type, see split AC installation, the step-by-step guide. For window units which use a different mounting process, see window AC installation, the step-by-step guide. For sizing copper before install, see AC copper pipe specifications and sizing. For placement of the outdoor unit, see the split AC outdoor unit placement guide. For bracket selection, see the AC bracket types and selection guide. For the errors this checklist is designed to catch, see AC installation mistakes, the checklist. For relocation, see the AC relocation process in India. For society paperwork, see society approval for AC installation in India. For all-in pricing, see the AC installation cost breakdown for India 2026.
Conclusion
A new AC is a 10 to 15 year asset whose lifetime is decided in the first three hours of installation. Every fault that costs four-figure money in years two through ten was either present on day one and missed, or seeded by a corner cut at commissioning. The 15-point owner checklist is not distrust towards the installer. It is the structure that turns a routine handover into a documented one, which is what protects both sides when a future dispute arises.
The two highest-value habits are the 20 minute cooling delta test and the 24 hour payment hold. The first catches every refrigerant and airflow issue, which together account for nearly seven in ten new-install callbacks in our ProNearMe network data. The second creates the only contractual mechanism that keeps the installer responsive past sign-off. Run those two and you have caught the bulk of what goes wrong. Run the full 15 and you have closed the loop.
Disclaimer
All cost ranges and pricing in this guide are typical residential figures across major Indian cities in May 2026 and exclude 18 percent GST applicable on most AC service, parts and installation labour. Installation fees, AMC pricing and brand warranty terms vary by city, dealer, brand and unit configuration. We strongly recommend hiring only NSDC-certified or OEM-trained technicians for any refrigerant handling, capacitor or PCB work, and verifying ISI and BEE markings on the unit before sign-off. ProNearMe does not endorse any specific AC brand or installation contractor, and the verification protocol in this guide applies across all residential air conditioner manufacturers and capacities sold in India.
Sources & References
- Bureau of Energy Efficiency Air Conditioner Standards and Labelling Programme
- Bureau of Indian Standards IS 1391 Room Air Conditioner Performance Standard
- Ministry of Environment, Forest and Climate Change Ozone Cell and Kigali Amendment Implementation
- National Skill Development Corporation HVAC Technician Qualification Pack
- Indian Society of Heating, Refrigerating and Air Conditioning Engineers Residential HVAC Guidelines
- Press Information Bureau Consumer Advisory on Appliance Warranty and Installation Practices
- Central Electricity Authority Wiring and Safety Regulations for Domestic Installations
- Ministry of Power Energy Conservation Building Code Residential Guidance
- Indian Plumbing Association Condensate Drain and HVAC Guidelines
- National Building Code of India Part 8 Building Services Section on Air Conditioning
Amit worked as an AC technician for 6 years in Ahmedabad before transitioning to technical writing. He holds a diploma in Refrigeration and Air Conditioning from ITI Ahmedabad and understands the difference between what AC companies promise and what actually happens on the ground. His articles break down complex technical topics into plain language that any homeowner can follow. He tests every tip he writes about in his own home first.

Dr. Verma is a mechanical engineer with 15 years of experience in HVAC systems. She completed her PhD from IIT Delhi on energy-efficient cooling solutions for Indian residential buildings. She reviews all technical content on HomePros to make sure the numbers are right, the advice is safe, and the recommendations are backed by actual engineering principles. She consults for multiple AC manufacturers on product design.